I have just booked my place on the UK's first polymer clay retreat - Polymer Pamper and Play. Here's the brochure if you are interested in coming too (click on the image to enlarge it)
The workshops will be taught by Carol Blackburn and Christine Dumont. you can find more information on Debbie Carlton's (who is organising it along with Rebecca Thickbroom) blog
for more information or to book a place please contact Rebecca on 07902 155 280 or info@polymerpamperplay.co.uk - let her know you saw it here.
Places are limited and being offered on a first come first served basis
Wednesday, December 15, 2010
Polymer Pamper and Play
Wednesday, December 8, 2010
Flickr
(I am supposed to be busy - distracting myself with catching up with blogging)
About a year ago, I spent some time (OK probably several days or even weeks!) browsing photos of amazing polymer clay work on Flickr and decided to set off on my journey from being someone who was playing with clay to someone who could create amazing things.
I love flickr, I check everyday to see what new delights my contacts have created. I can see images from artists from all over the world. There are thousands of groups for anything and everything but there wasn't one for just polymer clay work from the UK - so I started one. If you live in the UK please join the group and add some photos so we can show our collective talent http://www.flickr.com/groups/1499111@N22/pool/
Here's some images already in the group (thanks ladies!)
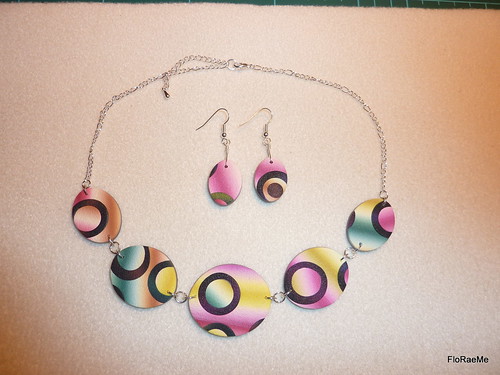 |
| Lindly Haunani bubble necklace by FloRaeMe |
 |
| Leaf Pendant by Ghost Shift |
Labels:
flickr,
FloRaeMe,
Ghost Shift,
Polymer Clay UK
One bead three colour ways
I did a little experiment today to see how the colours looked with these 'Natalia' beads. The top row has green inside the second row has turquoise inside and the bottom row is the 2 beads alternatively stung so 1 green inside, 1 turquoise inside etc.
I thought there would be more visiual difference between the 3 different colourways. They are different but on first glance it's not apparent as it's the overall colours you see not their placement. Nice to know I don't have to think about it so hard in future ;)
Purple and green jewellery set
Here's some green and purple jewellery I made using the technique I learnt from Natalia Garcia de Leaniz at Polymer Plays Days in Nottingham earlier this year.
You may recognise these colours as being the project which produced the scrap clay for the lentil pendant I showed you recently.
 |
| Yes a hat pin! But can also been worn as a brooch or decorating a bag. |
You may recognise these colours as being the project which produced the scrap clay for the lentil pendant I showed you recently.
Monday, December 6, 2010
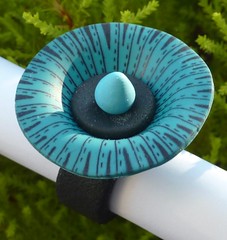
Ring türkis - just had to share it
I love to browse through pictures of people polymer clay work on flickr, there are so many amazingly talented people out there.
I often spot something I want to look at again and add it to my favourites. When I saw this photo it jumped off the screen at me! I just had to share it with you. Not quite sure exactly what it is about it, turquoise is my favourite colour (as you can probably tell;) It's by Edelchen, Christine Michel.
I often spot something I want to look at again and add it to my favourites. When I saw this photo it jumped off the screen at me! I just had to share it with you. Not quite sure exactly what it is about it, turquoise is my favourite colour (as you can probably tell;) It's by Edelchen, Christine Michel.
Sunday, December 5, 2010
Purple scrap swirl
Here's a pendant I made with some scraps from another project. I was rather taken with it, the little crystal dangles in just the right shade of purple (took the pendant to the shop to buy them!). It was sanded to a beautiful high gloss and felt wonderful. Needless to say about the 3rd person to see it bought it!
Monday, November 29, 2010
Pasta Machine Thickness comparison table
Since I started improving my polymer clay work by following tutorials and going to workshops I have found it very confusing when people give you a pasta machine thickness as the different brands (particularly Atlas and Imperia the main 2 quality machines) don't compare easily. I have an Imperia machine which I love, it is easy to take apart to clean, only requiring to remove the end plate on one end (the one without the knob) with 1 screw and then I can push out the rods by hand and clean the scraper plates. I recently acquired a cheap Kitchen Craft pasta machine which looks like an Atlas but it doesn't run smoothly and the clay always wrinkles up on settings 8 and 9 - I would pay the extra and get a quality machine if you can.
I spent a lovely day in London yesterday with the London Polymer Clay Group (it was a blissful 2 hours on the train from me which I thoroughly enjoyed and I managed to squeeze a flying visit in to the jewellery gallery at the V&;A museum too!). I had already made thickness chips for the 2 machines I have and Nina kindly allowed me to make a set on her Atlas so now I have all 3! Here's the measurements
They will probably be a bit different from machine to machine and possibly even from different sides of a sheet depending on how straight the rollers are but hopefully it's a useful starting point.
So if you want to compare I would say as long as you remember a 1 on an Imperia is about the same as a 2 on an Atlas, 3,4 and 5 are much the same and the thinnest on an Imperia is like a 7 on an Atlas.
(Toni the table won't be visual enough for you - your machine is very close to the atlas measurements)
I spent a lovely day in London yesterday with the London Polymer Clay Group (it was a blissful 2 hours on the train from me which I thoroughly enjoyed and I managed to squeeze a flying visit in to the jewellery gallery at the V&;A museum too!). I had already made thickness chips for the 2 machines I have and Nina kindly allowed me to make a set on her Atlas so now I have all 3! Here's the measurements
So if you want to compare I would say as long as you remember a 1 on an Imperia is about the same as a 2 on an Atlas, 3,4 and 5 are much the same and the thinnest on an Imperia is like a 7 on an Atlas.
(Toni the table won't be visual enough for you - your machine is very close to the atlas measurements)
Friday, November 26, 2010
Autumn flowers
I had a custom order of a crochet hook in autumn colours. I decided to use my now firm favourite spliced flower cane. I started making this cane thanks to a video from Cindy Leitz
I decided to use the flower cane to make a few other bits...
I decided to use the flower cane to make a few other bits...
 |
| Autumn colours cabochon pendant - super shiny! |
 |
| Autumn owl (with glow in the dark eyes) - flew straight off my sale table! |
Gingerbread men
My friend Moe has been making some super cute Hawaiian gingerbread men and hula girls - like this...
I got inspired and made some more traditional gingerbread men Christmas earrings.
I got inspired and made some more traditional gingerbread men Christmas earrings.
Labels:
earrings,
gingerbread men,
Moe Art,
polymer clay
Thursday, November 25, 2010
'From Polymer to Art' a review
I have now received my copy of 'From Polymer to Art'. It is the first edition, a sneak preview before the sale launches in 2011. Each edition will have a colour theme, this first one being Red.
It feels and it looks nice. The paper is a good quality paper and the magazine has been set out beautifully, interspersed with the articles and tutorials are snippets of poems and pictures of things red. There is a page of photographs of different red flowers. In this preview edition the advertising pages are blank but I see there are plenty of spaces for advertising although not so much that it overwhelms the content as in some magazines.
There are 8 tutorials at a range of levels including these fab projects...
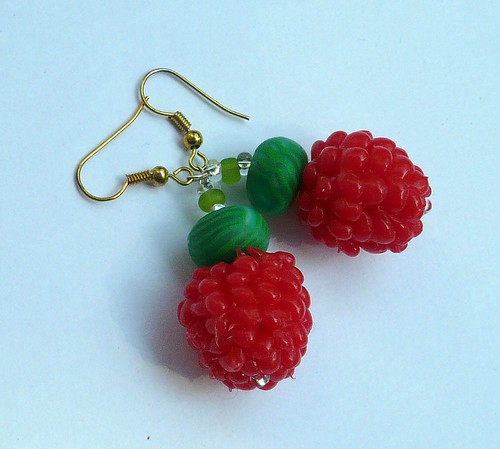
Red berries tutorial by Oksana Volkova
Oksana's work is new to me and I love these berries - so realistic - can't wait to try it!!
It feels and it looks nice. The paper is a good quality paper and the magazine has been set out beautifully, interspersed with the articles and tutorials are snippets of poems and pictures of things red. There is a page of photographs of different red flowers. In this preview edition the advertising pages are blank but I see there are plenty of spaces for advertising although not so much that it overwhelms the content as in some magazines.
There are 8 tutorials at a range of levels including these fab projects...

Red berries tutorial by Oksana Volkova
Oksana's work is new to me and I love these berries - so realistic - can't wait to try it!!
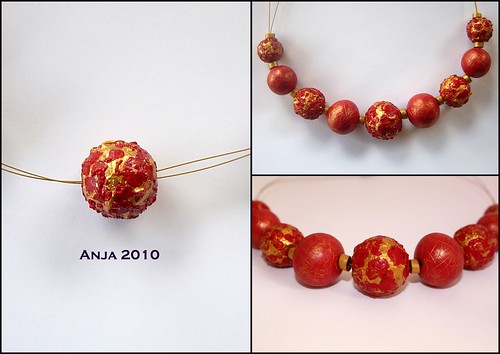 |
| Baroque Necklace Tutorial by Anja Overdijk Anja is another artist I did not already know and I greatly enjoyed browsing through her flickr photos. A Red shades Skinner blend necklace tutorial by Cecilia Botton - Mabcrea. I can't find a photo of this project but I like it, it is reasonably simple but very effective. I have been a fan of her work for sometime having discovered her beautiful creations on flickr There is a tutorial on producing patterned clay sheets using alcohol inks and stencils from Jan Geisen, another new artist to me. It is an interesting project and she has included some different variations of finished jewellery pieces to get your creative juices well and truly flowing! There are 2 tutorials from the fabulous Fabi . I have been following her blog for a while now (with the help of Google translate!) and if you haven't seen it already you should definitely check it out!   So the big question - is it worth it? It is expensive but it is a good quality magazine with good content. It only comes out 4 times a year so it's not a monthly expense. I will certainly be subscribing! Thank you ladies for publishing a quality polymer clay dedicated magazine! |
Saturday, November 20, 2010
Owls
I am enjoying showing off my jewellery at the Totterdown Arts Trail this weekend and have sold loads of my little tortoises. I came home last night and made some more and did the same tonight, hopefully I will have enough to see my through to tomorrow evening! A customer today asked me if I ever made owls, my reply was not yet but I will! So here is my first batch of owls, I'll see if they fly off the table tomorrow!
Sunday, November 14, 2010
New Polymer Clay Magazine
I have just found out about a new polymer clay magazine From Polymer to Art from a blog post by Fabi on http://fabicontusmanos.blogspot.com , I have ordered a copy and can't wait to see it. From her blog post and the magazine website where I ordered my copy it looks very exciting! They ship worldwide.
Tuesday, November 9, 2010
Emerald green custom order
I had a custom order for a flower pendant in Emerald Green. I had some similar style pendants (the technique is from Ayelet Beads flower tutorial which I would highly recommend!) but I found it really hard to know if the customer would like them so I made a few variations. Hopefully she will get to see them this week (I have a sale on Saturday so I want to put the ones she doesn't choose on display then) so I will let you know which one she chooses. My favourite is the top one.
Saturday, November 6, 2010
One of my custom orders
At the 2 sales I have had I have taken quite a few orders. I am finding it quite tricky to be confident the customer will like what I've made so I have given them some options. This order was for a friend who lived locally so I made the beads and then took them to show her before I strung them.
She requested a spliced flower cane necklace on a cord with no metal clasps etc. in similar colours to this bracelet
She requested a spliced flower cane necklace on a cord with no metal clasps etc. in similar colours to this bracelet
There are about 12 different shades of browns and oranges and pinks and white and black in this bracelet so it was going to be tricky picking up on that in a spliced flower where I normally use 4 sometime 6 colours.
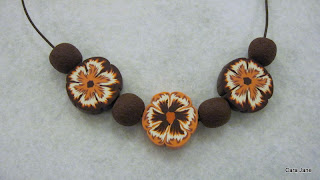
These are the beads I made. I realise I forgot to take a picture of the finished necklace so will have to pop over for a cup of tea soon to do so. In the end it was strung with 5 flowers and some pink beads between the flowers as she wanted it to look lighter in colour. I finished it off with sliding knots, it took me about 5 attempts to get it the right length for her. I am looking forward to seeing her wear it!
Thursday, November 4, 2010
Flower charm bracelet
I started this bracelet sometime ago but felt it needed something more, something to brighten it up. I had lots of great suggestions from arty friends and in the end I decided to add the yellow beads you can see to match the yellow of the flower centres. I would have put some little crystals inside the flowers but I had already wire wrapped them onto the bracelet by then and didn't fancy doing it all again!
I will show you my new matching pendant up close tomorrow and I've got some custom orders to show you too.
Till then...
Cara
I will show you my new matching pendant up close tomorrow and I've got some custom orders to show you too.
Till then...
Cara
Monday, November 1, 2010
Exhibition excitement!!!
I was very exited today to find out that a piece of jewellery I submitted has been accepted for an exhibition in a couple of weeks. It's the Totterdown lights exhibition which will showcase the 'cutting edge of what the Totterdown Arts Trail has to offer'. There is a private screening on the opening night of the exhibition for the press and 'key decision makers from within the art field' to which I get an invitation plus one (trying to work out if I should take hubby or an arty friend - will probably depend on if I can get a baby sitter!).
I am then exhibiting as a part of the Arts Trail the following weekend. The arts trail is where different people within an area open up their homes to exhibit art. Often there are 2 or 3 different artists showing their work in one venue. There is a leaflet printed with a map showing all the different houses taking part and detailing who will be exhibiting.
I am then exhibiting as a part of the Arts Trail the following weekend. The arts trail is where different people within an area open up their homes to exhibit art. Often there are 2 or 3 different artists showing their work in one venue. There is a leaflet printed with a map showing all the different houses taking part and detailing who will be exhibiting.
 |
| This is the piece I will have in the exhibition |
Sunday, October 31, 2010
Another sale and my new pendant!
I have been busy with another sale and 3 more on the way! Here is a picture of most of my sale set up, there's a bit more on the left which is missing but you get the general idea. It was at a party of my sisters (slighty strange) but good fun as I got to go to a party and talk about my passion most of the night!
I bought myself a new top and couldn't resist making a pendant to match! I have just discovered making cabochons thanks to Donna Kato's -The Art of Polymer Clay Creative Surface Effects book. I'll take a close up photo to show you in the daylight tomorrow. didn't have time when I made it as I made it the morning of the sale - like you do! I think it was my antidote to the overwhelming amount of stuff I was trying to do - ignore it all and play with clay!
 |
| Sale table |
 |
| Me wearing the pendant I made to match my new top |
Friday, October 15, 2010
Sale success!
I had a great evening, thanks to Kate and Sarah for inviting me along with my jewellery! It was a lovely evening where people were having their feet pampered and milling around with wine and nibbles. I think I will have to add myself as a client next time! There were about 12 ladies there and many of them had ideas for different colour schemes or slightly different designs so I have some custom orders to get working on!
Here is a small selection of my sold items
I have another 3 sales in the next 5 weeks and some custom orders so I had better keep playing with my clay - such a hard life ;)
Here is a small selection of my sold items
 |
| Mokume Gane pendant |
 |
| Petal earrings |
 |
| scrap clay lentil bead |
 |
| Didn't sell all these tonight but I did sell quite a few |
Thursday, October 14, 2010
First real sale tomorrow! Here's my new tags
I am doing a small sale tomorrow night so have been busy getting ready. It is as part of a small pamper night. I will probably be the only vendor and there will only be about 12 guests but it will be a good opportunity to see how people react to my jewellery and my pricing! I find the pricing difficult (well who doesn't!), I know how long it takes to make and don't want to undersell it but at the same time I want it to be affordable.
I have some great friends who have helped me whilst calling round for tea and we have made some cardboard busts and display cones (will tell you more about those later) and made some funky new 'mini business card' tags (my sisters brilliant idea!). I am putting the price on a little yellow dot sticker on the back - easy to remove in case it is a gift (easy for me to change too!). I had an idea about printing a flower and putting the price yellow dot in the middle but that's a job for when I too much time on my hands!
I'll let you know how it goes!
I have some great friends who have helped me whilst calling round for tea and we have made some cardboard busts and display cones (will tell you more about those later) and made some funky new 'mini business card' tags (my sisters brilliant idea!). I am putting the price on a little yellow dot sticker on the back - easy to remove in case it is a gift (easy for me to change too!). I had an idea about printing a flower and putting the price yellow dot in the middle but that's a job for when I too much time on my hands!
 |
| Front side of tag |
 |
| Back of tag with contact details. |
 |
| Here's a set with their matching tags and earring cards |
 |
| Big business card to put hair slides on |
I'll let you know how it goes!
Subscribe to:
Comments (Atom)


